


A few weeks ago, my friend Greg asked me to make him a gluten free ice cream cake for his upcoming birthday.
I’ve never made an ice cream cake before…hm…
Never one to turn down a challenge, I accepted my mission and got to researching. After watching many home-made how-to videos on the net, and scouring over the Food Network and other cooking sites and blogs, I put all my knowledge together and got to work.
Greg’s favorite ice cream cake is the Baskin Robbins mint chocolate chip cake, A.K.A: he had high expectations!
Lucky for me, I have high expectations for myself. Everybody wins!
In my research, I found that there were more methods than I expected to find when it comes to making an ice cream cake. The most popular method was to use a spring form pan and build the cake in that.
Well, A. I don’t own a spring form pan and didn’t want to buy one just for this occasion, and B. if I were to use a spring form pan, I would have to wait around until the party was over to rescue the bottom of the pan and take it home! This is clearly not a viable option: if I’m going to make gluten free ice cream cakes in the future, I can’t be leaving the bottoms of my pans at people’s houses! That’s just crazy talk!
No, no, the spring form pan would just not do.
Then I decided to take a peak at a food blog I really love, What’s Gaby Cooking http://whatsgabycooking.com/ice-cream-cake/. I met this chef, Gaby Dalkin, at a food blogger conference last year, and really liked her!

Do you see this beautiful cake she made? And what a beautiful photo too! I have much to learn from her!
Anyway, I was inspired by her method, which didn’t require me to invest in a new pan that I would never use again. She simply used a brownie as her base on which she could build her cake – brilliant!
Ok – a little less talk, a little more action: Here is my adapted, gluten free ice cream cake:
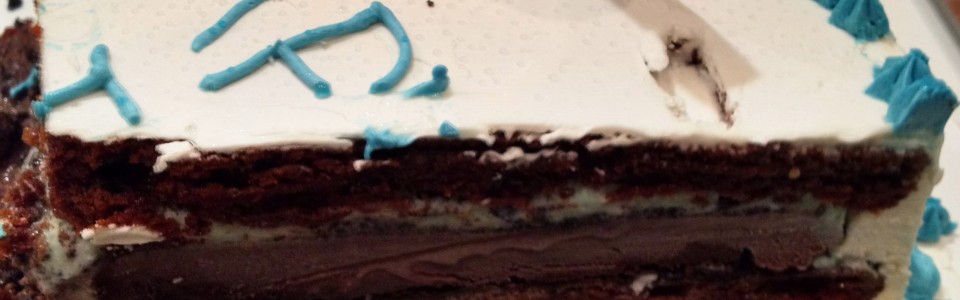
Gluten Free Mint Chocolate Chip Ice Cream Cake

Gluten free brownie, go to Elena’s Pantry http://www.elanaspantry.com/brownies/ it is THE BEST!
2 473ml cartons of gluten free mint chocolate chip ice cream (I used Telenti)
1 900ml carton of gluten free chocolate ice cream (I used premium dark chocolate, Trader Joe’s brand)
1 package of gluten free oreo cookies (I used KinniTOOS of Kinnikinnich Foods – found them at Whole Foods), crushed
Buttercream
2 sticks (1 cup) softened, unsalted butter
4- 6 cups powdered sugar
1 teaspoon vanilla
1/4 cup cream
pinch of salt
Tools
Cake turntable (if you don’t have one, it’s no biggy. This just makes it much easier to ice and build cakes. If you make cakes often, invest in one – you will love me for it, just sayin…)
2 12 inch pans
Parchment paper
Vegalene or some kind of canola oil, non-stick spray
Large offset spatula
1 12 inch cardboard cakeboard
1 14 inch base for the cake to be serve on (I used a 1/4 thick white foam board)

1. Bake the brownie according to Elena’s recipe and instructions. Divide the batter into 2 12 inch pans. Don’t worry: the batter will just barely cover the bottom of your greased, parchment paper lined pans. This is ok, because we only want the brownie to be about an inch in height anyway. Let the brownie cool. Set aside.
2. When you’re ready to work with the brownie, take out your mint chocolate chip ice cream from the freezer, and let it sit on the counter at room temperature for about 20-30 minutes, just until it’s soft enough to spread like icing, but not soupy. Flip the brownie out of the pan and onto the cake board: you want the flat side of the brownie to be upright so it provides a flat surface for you to ice on. Place the cakeboard and brownie on your cake turntable.
3. Spread your ice cream on the brownie as evenly as possible, getting as close to the edge as possible. Sprinkle some crushed oreo cookies on top of the ice cream layer so that the cookies cover the entire surface area of the ice cream. Place in the freezer for at least 30 minutes, or until firm.
4. Repeat the same step with the chocolate ice cream. Add another layer of cookie crumbs. Place back in the freezer for 30 minutes.
5. Repeat the same step with the second carton of mint chocolate chip ice cream. This time, instead of putting more cookie crumbs on top, place the brownie on top of the ice cream, flat side up to provide a flat top on which to ice. Place the cake in the freezer for another 30 minutes.
6. At this point, I covered the cake in plastic wrap to avoid freezer burn, and let it sit in the freezer overnight. I iced it the next day. If you want to do it all in one day, just let the finished cake sit in the freezer for at least 2 hours before icing it to ensure it’s firm enough.
7. Make your buttercream: whip the butter for about 3 mintues until smooth. Add your cream, vanilla, salt, and 1 cup of sugar at a time. Whip until smooth. Place the cake on your cake turntable and ice it fast, before it melts!! Place it back in the freezer.
8. If you want to do what I did, choose a food color, and dye some of your leftover icing. Place in a piping bag with a star tip, and make your patterns accordingly.
9. To do the happy birthday writing, switch tips to a small round.


The verdict? Maybe Greg was just being nice, but this cake was such a home run that I’m pretty sure it booted the Baskin Robbins cake out of 1st place. No big deal.
True? Not true?
There is only one way to find out 🙂 Happy baking!
Lauren
xxx
Gaby Dalkin (@WhatsGabyCookin)
April 24th, 2012 16:46
LOVE this cake!! So glad you made it!!! xoxoxo
delectableyou
April 26th, 2012 6:17
Thanks, Gaby - me too! Thank you for being such an inspiration!!! I LOVE LOVE LOVE your blog and your work!!!
Sarah Roberts
April 24th, 2012 21:57
I love reading your blog, makes me laugh out loud AND inspires me to want to cook more!! You need to have a chamonix cooking school!! :-)
delectableyou
April 26th, 2012 6:18
Oh you are too sweet! I don't know about a Chamonix cooking school, but perhaps one closer to home? Will work on opening the bakery first :) I MISS YOU!!
my blog
July 27th, 2017 7:40
Useful information. Lucky me I discovered your website unintentionally, and I'm surprised why this twist of fate did not happened earlier! I bookmarked it.
click here
July 27th, 2017 7:40
This is the perfect site for anyone who wants to understand this topic. You understand a whole lot its almost hard to argue with you (not that I actually would want to…HaHa). You definitely put a brand new spin on a topic that has been discussed for ages. Great stuff, just wonderful!
my blog
July 27th, 2017 7:41
Spot on with this write-up, I absolutely feel this website needs a lot more attention. I'll probably be back again to read through more, thanks for the information!
my blog
July 27th, 2017 7:41
If some one desires expert view regarding blogging afterward i recommend him/her to go to see this website, Keep up the nice job.
Lelio Vieira Carneiro Junior
July 31st, 2017 16:08
I pay a visit each day a few blogs and blogs to read content, however this weblog presents feature based writing.
Lelio Vieira Carneiro Junior
July 31st, 2017 16:21
Terrific article! That is the type of info that are supposed to be shared around the web. Disgrace on Google for now not positioning this put up higher! Come on over and seek advice from my web site . Thank you =)